![[POV RAY]](/images/atari-phile/povray_t.png)
POV-Ray for Beginners - Part 2
By Adam Foster...
In the last tutorial, I showed you how to use the basics of the Persistence of Vision Raytracer, POV-Ray. You should now be able to place various shapes wherever you like in 3D, define their colours and the lighting, and finally raytrace it. In this tutorial, I will demonstrate the basics of a very powerful part of POV-Ray, the Construtive Solid Geometry (CSG), and how to use the supplied textures and colours.
What is CSG then? Basically it's a method of putting shapes together in order to make more complex ones. You can 'cut' a sphere out of a cube, in order to make a hemispherical depression, or 'add' it to the cube, making a hemispherical bulge. There's a lot you can do, as shown by the example file below. Type it out, render it and see what you get.
camera{
  location <0, 9, -15>
  look_at <0, 4, 0>
}

light_source { <20, 70, 0> color rgb <1.0, 1.0, 1.0> }
light_source { <-30, 30, -8> color rgb <1.0, 0.9, 0.9> }

object {
  difference {
    intersection {
      box { <-4, 0, -4>, <4, 8, 4> }
      sphere { <0, 4, 0> 5.1 }
    }
    sphere { <0, 4, 0> 4.6 }
  }
  pigment { rgb <0.9, 0.4, 0.5> }
}

plane { y, -1.0
  pigment { rgb <0.2, 0.2, 1.0> }
}
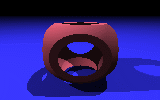
For those of you who can't wait, I've rendered it for you.

As you can see, it isn't an ordinary shape at all! You may be able to see what all these new commands do, such as intersection, difference and so on, but here's a quick explanation.
Union
This command is like digital 'glue', in that you can use it to stick objects together. It is possible to simply place the objects together without it, so you get the same results, but it should be noted that after using a union command, you can rotate, scale and move the resulting composite without any problems. Something else to note is that if a shape within the union is given a different colour, it stays that colour when rendered. An example of a union is shown below.
      union {
        sphere { <0, 0.5, 0> 1 pigment { Red } }
        sphere { <0, 0.0, 0> 1 }
        sphere { <0,-0.5, 0> 1 }
        pigment { Blue }
      }
Difference
This command is used to 'chop' sections out of other shapes. You will see in the example above that it is used to remove a large sphere from the centre of a cube. You can thing of it as being 'shape 1 - shape 2 - shape 3' and so on. A small example of this is shown below.
     difference {
       sphere {<-0.75,0,0>,1}
       sphere {< 0.75,0,-0.25>,1}
       pigment {Yellow}
     }
Intersection
This is effectively a Boolean 'And' operation, in the same way that difference is a 'Not', and union is an 'Or'. If you don't know how Boolean logic works, look it up. It's pretty simple, anyway. This command is used in the example file to make the main shape halfway between a 'cube' and a sphere. It's very powerful, and very useful. Play around with it, to see what you can do.
Include Files
You are probably getting pretty bored of having to type out the red, green and blue values of colours every time, so I thought it would be a good idea to show you how to use 'include' files. These can define all sorts of things, such as shapes, colours and textures, and make complex scenes much easier to produce. Probably the two most useful 'standard' include files are two which come with POV-Ray, colors.inc and textures.inc. You'll see how to use the textures and the colours in the example file below, which is a modified version of the one above.
#include "colors.inc"
#include "textures.inc"

camera{
  location <5, 10, -14>
  look_at <0, 4, 0>
}

light_source { <20, 70, 0> color White }
light_source { <-30, 30, -8> color White }

object {
  difference {
    intersection {
      box { <-4, 0, -4>, <4, 8, 4> }
      sphere { <0, 4, 0> 5.1 }
    }
    sphere { <0, 4, 0> 4.6 }
  }
  texture { White_Marble
    scale <5, 5, 5> }
}

plane { y, -1.0
  texture { Blue_Agate
    scale <10, 5, 10> }
}

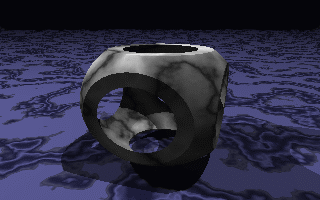
I've rendered this one, too, as you can see. One thing you may have noticed is the scale commands. These are used to scale the texture by the relevant amount, so it looks right on your object. The numbers are x, y, and z amounts; you can think of the pattern as being approximately 1 unit across, and you scale it to however large (or small) you want it. You will also see the superb quality of the end result. POV-Ray textures are not image-mapped on to the surface, instead they seem to use some sort of three-dimensional turbulence to produce some very natural looking shapes, which don't repeat themselves!
I suggest you keep on playing around with it, now that you have enough
knowledge to do so. You can email any good scenes you produce to me on afoster@zetnet.co.uk, but
please only send the POV description file!
In the next tutorial, I will demonstrate how to use the rather complex translate and rotate commands, and show you more on the define commands.